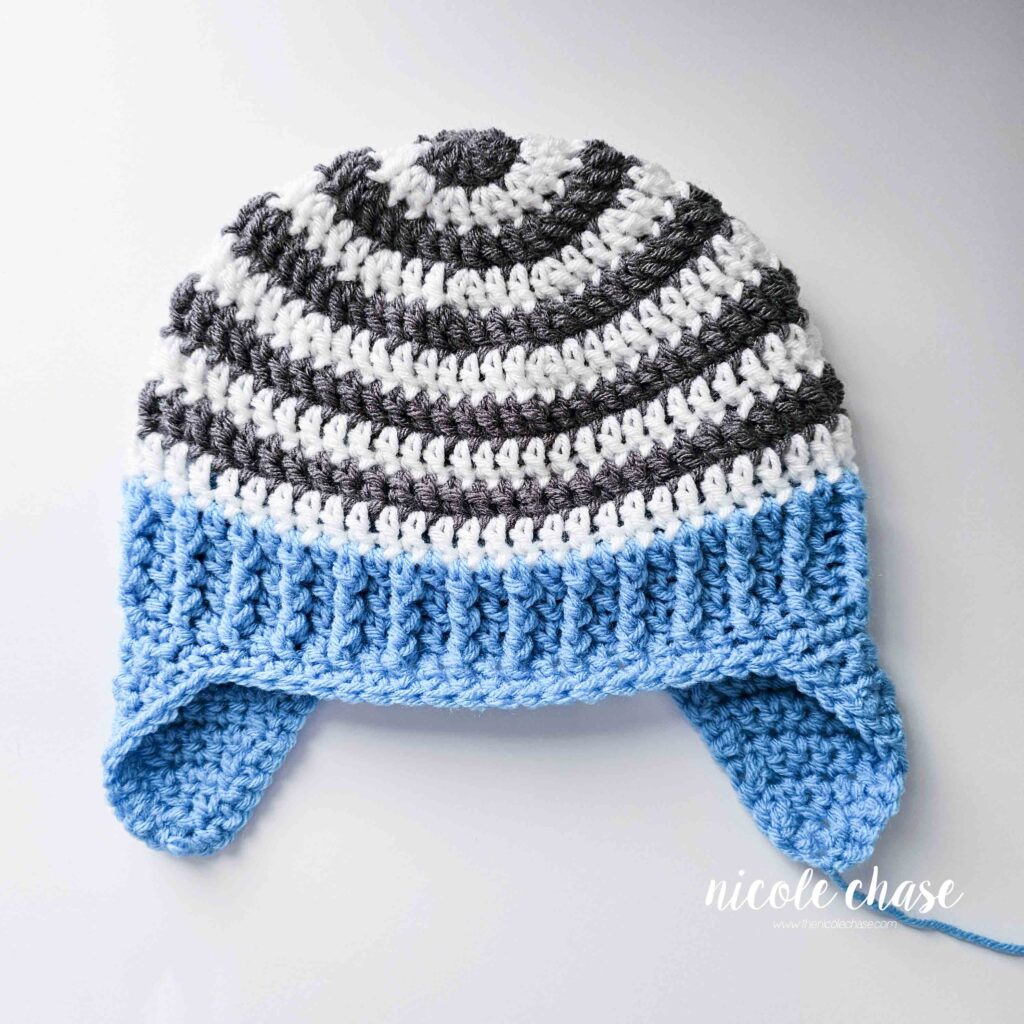
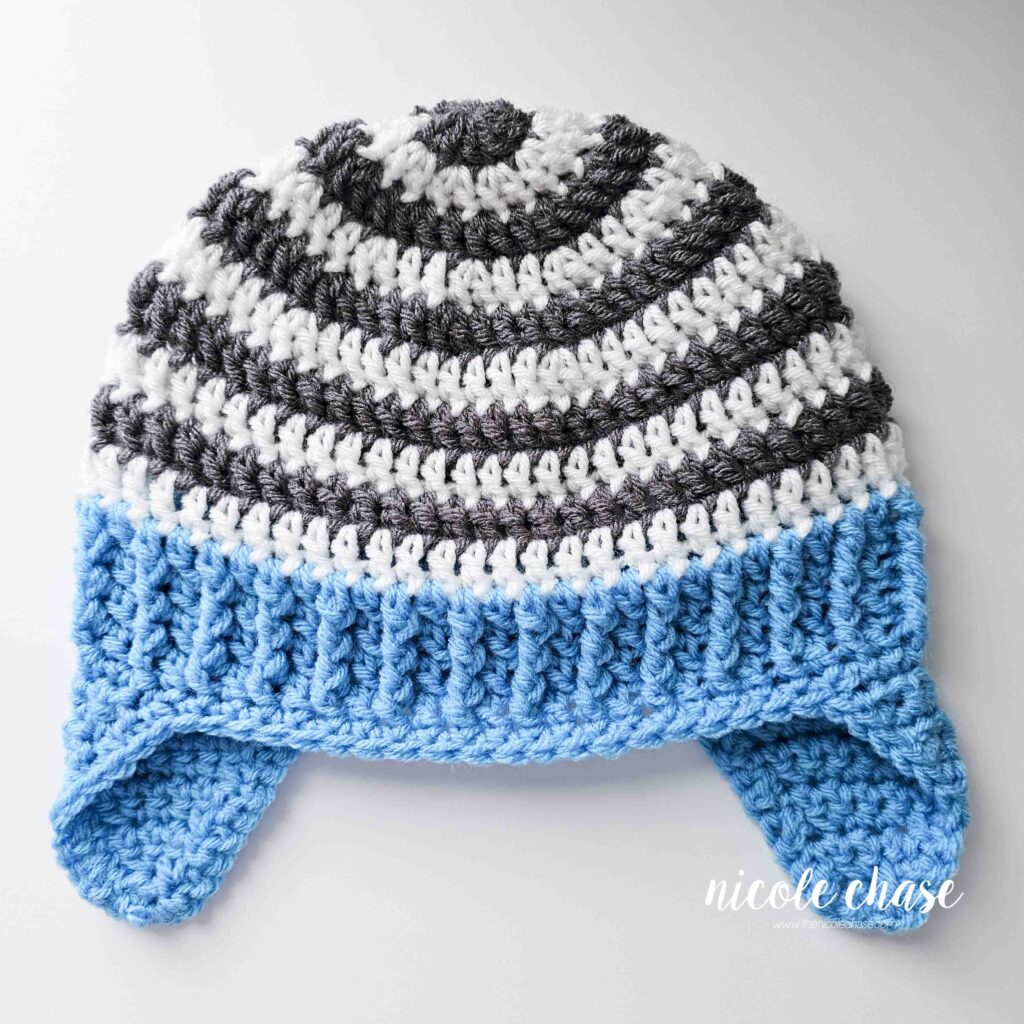
Spirit Earflap Hat – Free Crochet Pattern
Want to learn how to crochet an earflap hat? This Spirit Earflap Hat is a free crochet pattern with a simple and modern twist on the basic crochet earflap hat with it’s textured brim and tassels.
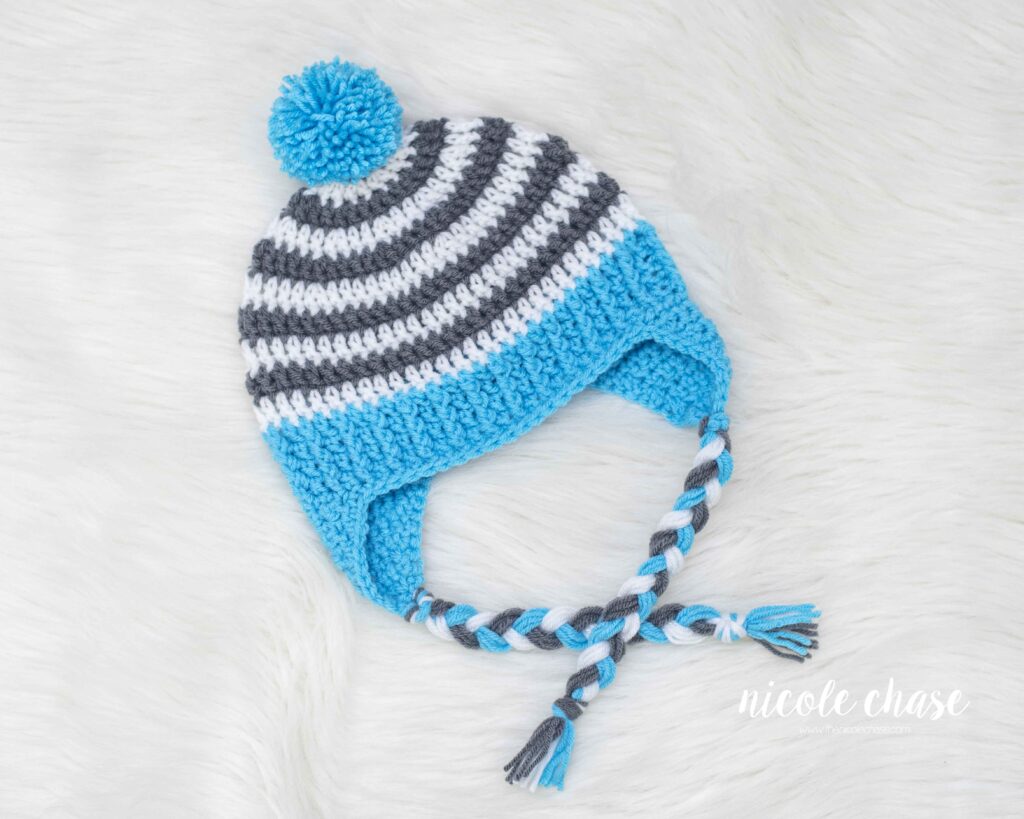
This beginner friendly crochet earflap hat pattern includes a full range of sizes, including: 0-3 months, 3-6 months, 6-12 months, toddler, child, teen, and adult.
Table of Contents
I hope you enjoy this free crochet pattern available here on my blog! An ad-free, formatted PDF version of this crochet pattern is also available for purchase here:
Pin this free crochet earflap hat on Pinterest.
Be sure to save this crochet earflap hat free pattern to your favorites on Ravelry and add it to your project queue!
Free Crochet Pattern for Spirit Earflap Hat

Pattern Specifics
Size: 0-3 months, 3-6 months, 6-12 months, toddler, child, teen, adult
Gauge: 2” = 4 DC rows and 7 DC sts
Hook Size: 5.5mm (I) crochet hook* (see notes)
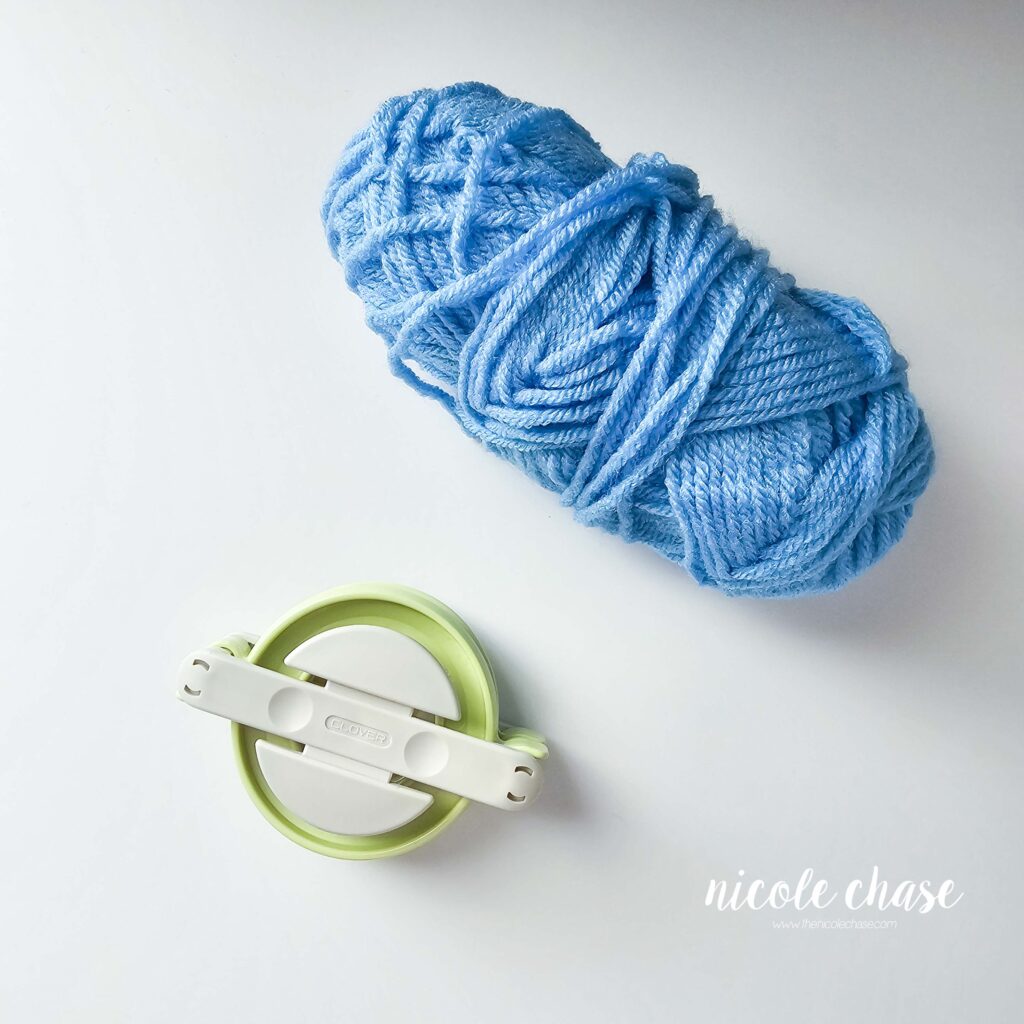
Other Tools: tapestry needle, scissors, pom maker
Yarn Weight: Medium (4), Worsted Weight
Yarn Used: Premier Just Yarn, Red Heart with Love, WeCrochet Knit Picks Brava Worsted
Other Materials: n/a
Stitch Abbreviations
st = stitch
sl st = slip stitch
ch = chain
DC = double crochet
FPDC = front post double crochet
SC = single crochet
SC2tog = single crochet 2 stitches together
Notes
- Note that your yarn choice, hook size, and tension will affect the sizing of this project. Please check your gauge prior to starting this pattern. If you do not compare your gauge to that of the design, it is possible that your sizing will be affected.
- Approximate circumference for reach size is the measurement that your hat will comfortably stretch to. The actual width of the hat may be slightly shorter.
- Note that age-based sizes are the average measurements for that size, based on the standards set forth by the Craft Yarn Council. It is always best to base your sizing on the actual head circumference.
- Chain 1 or 2 at the beginning of each row does NOT count as a stitch (unless otherwise specified).
Pattern
Using 5.5mm (I) crochet hook:
0-3 Months
Approx. circumference: 13” / Approx. length: 5”
Hat Base
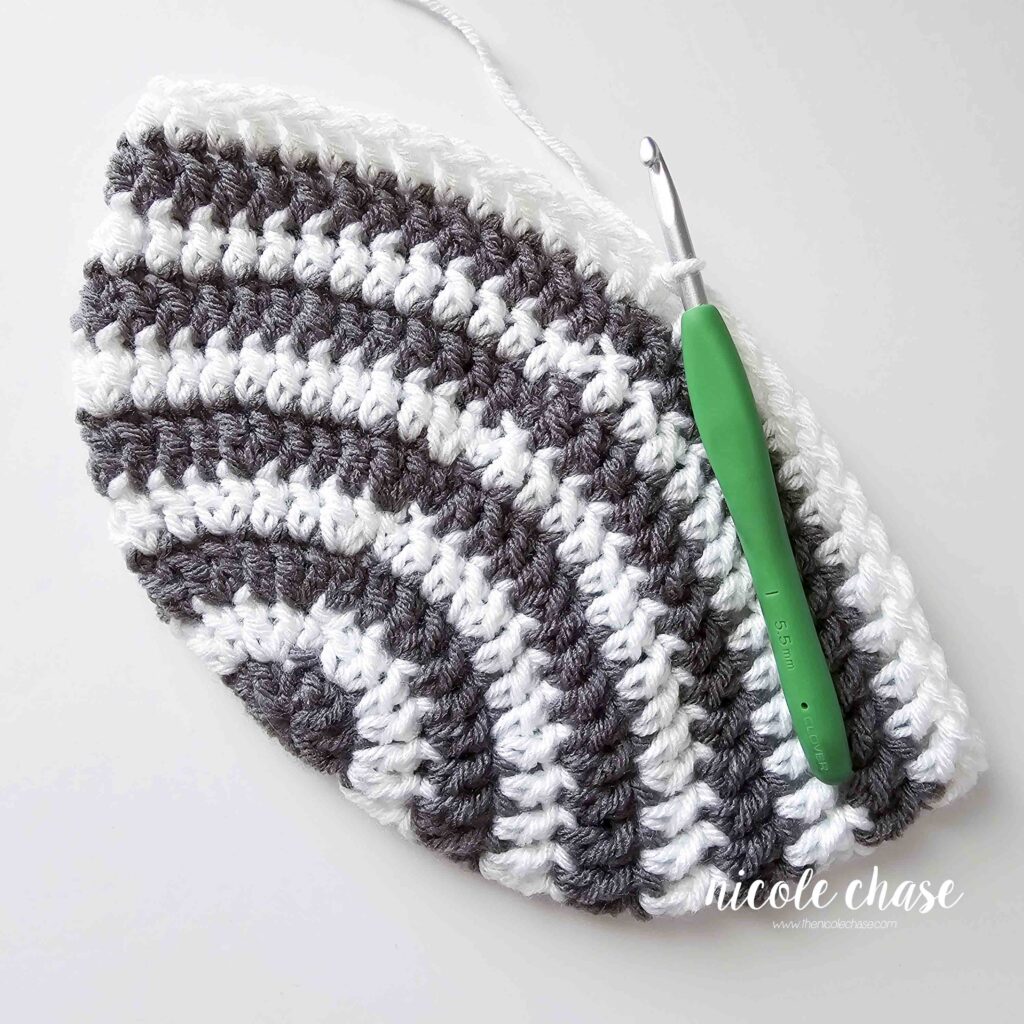
Beginning with color A (shown as gray), and alternating each row with color B (shown as white):
R1: Using a magic ring, ch 2. 10 DC. Join with a sl st to beginning. (10 sts)
R2: Ch 2, 2 DC in each st around. Join with a sl st to beginning. (20 sts)
R3: Ch 2, 2 DC in next st, 1 DC in next st. Repeat around. Join with a sl st to beginning. (30 sts)
R4: Ch 2, 2 DC in next st, 1 DC in each of the next 5 sts. Repeat around. Join with a sl st to beginning. (35 sts)
R5-6: Ch 2, 1 DC in each st around. Join with a sl st to beginning. (35 sts)
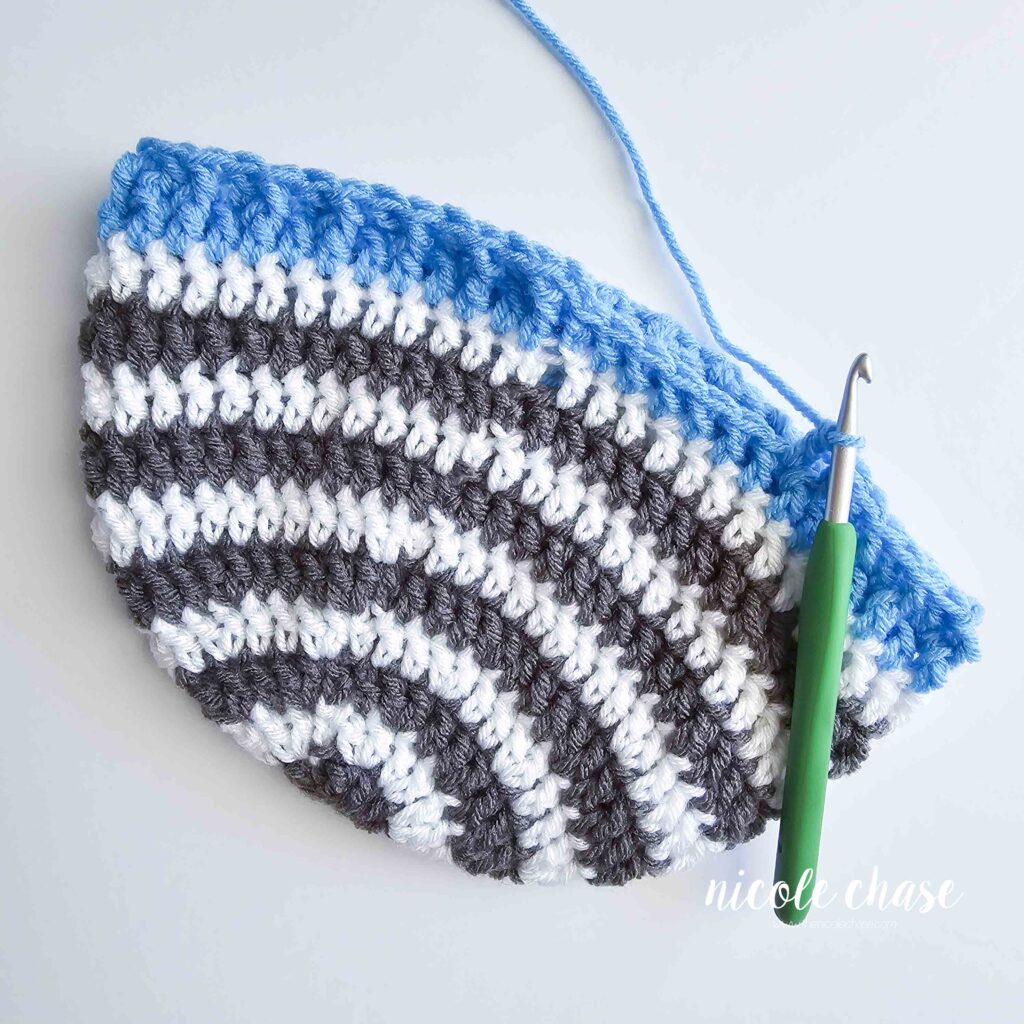
Using color C (shown as blue):
R7: Ch 2, 1 DC in each st around. Join with a sl st to beginning. (35 sts)
R8-9: Ch 2, 1 FPDC in next st, 1 DC in next st. Repeat around. Join with a sl st to beginning. (35 sts)
Do not fasten off, begin on Earflap 1.
3-6 Months
Approx. circumference: 14” / Approx. length: 5.5”
Hat Base
Beginning with color B (shown as white), and alternating each row with color A (shown as gray):
R1: Using a magic ring, ch 2. 10 DC. Join with a sl st to beginning. (10 sts)
R2: Ch 2, 2 DC in each st around. Join with a sl st to beginning. (20 sts)
R3: Ch 2, 2 DC in next st, 1 DC in next st. Repeat around. Join with a sl st to beginning. (30 sts)
R4: Ch 2, 2 DC in next st, 1 DC in each of the next 2 sts. Repeat around. Join with a sl st to beginning. (40 sts)
R5-7: Ch 2, 1 DC in each st around. Join with a sl st to beginning. (40 sts)
Using color C (shown as blue):
R8: Ch 2, 1 DC in each st around. Join with a sl st to beginning. (40 sts)
R9-10: Ch 2, 1 FPDC in next st, 1 DC in next st. Repeat around. Join with a sl st to beginning. (40 sts)
Do not fasten off, begin on Earflap 1.
6-12 Months
Approx. circumference: 16” / Approx. length: 6”
Hat Base
Beginning with color A (shown as gray), and alternating each row with color B (shown as white):
R1: Using a magic ring, ch 2. 10 DC. Join with a sl st to beginning. (10 sts)
R2: Ch 2, 2 DC in each st around. Join with a sl st to beginning. (20 sts)
R3: Ch 2, 2 DC in next st, 1 DC in next st. Repeat around. Join with a sl st to beginning. (30 sts)
R4: Ch 2, 2 DC in next st, 1 DC in each of the next 2 sts. Repeat around. Join with a sl st to beginning. (40 sts)
R5: Ch 2, 2 DC in next st, 1 DC in each of the next 7 sts. Repeat around. Join with a sl st to beginning. (45 sts)
R6-8: Ch 2, 1 DC in each st around. Join with a sl st to beginning. (45 sts)
Using color C (shown as blue):
R9: Ch 2, 1 DC in each st around. Join with a sl st to beginning. (45 sts)
R10-11: Ch 2, 1 FPDC in next st, 1 DC in next st. Repeat around. Join with a sl st to beginning. (45 sts)
Do not fasten off, begin on Earflap 1.
Toddler
Approx. circumference: 18” / Approx. length: 7”
Hat Base
Beginning with color B (shown as white), and alternating each row with color A (shown as gray):
R1: Using a magic ring, ch 2. 10 DC. Join with a sl st to beginning. (10 sts)
R2: Ch 2, 2 DC in each st around. Join with a sl st to beginning. (20 sts)
R3: Ch 2, 2 DC in next st, 1 DC in next st. Repeat around. Join with a sl st to beginning. (30 sts)
R4: Ch 2, 2 DC in next st, 1 DC in each of the next 2 sts. Repeat around. Join with a sl st to beginning. (40 sts)
R5: Ch 2, 2 DC in next st, 1 DC in each of the next 3 sts. Repeat around. Join with a sl st to beginning. (50 sts)
R6-9: Ch 2, 1 DC in each st around. Join with a sl st to beginning. (50 sts)
Using color C (shown as blue):
R10: Ch 2, 1 DC in each st around. Join with a sl st to beginning. (50 sts)
R11-13: Ch 2, 1 FPDC in next st, 1 DC in next st. Repeat around. Join with a sl st to beginning. (50 sts)
Do not fasten off, begin on Earflap 1.
Child
Approx. circumference: 20” / Approx. length: 7.5”
Hat Base
Beginning with color A (shown as gray), and alternating each row with color B (shown as white):
R1: Using a magic ring, ch 2. 10 DC. Join with a sl st to beginning. (10 sts)
R2: Ch 2, 2 DC in each st around. Join with a sl st to beginning. (20 sts)
R3: Ch 2, 2 DC in next st, 1 DC in next st. Repeat around. Join with a sl st to beginning. (30 sts)
R4: Ch 2, 2 DC in next st, 1 DC in each of the next 2 sts. Repeat around. Join with a sl st to beginning. (40 sts)
R5: Ch 2, 2 DC in next st, 1 DC in each of the next 3 sts. Repeat around. Join with a sl st to beginning. (50 sts)
R6: Ch 2, 2 DC in next st, 1 DC in each of the next 9 sts. Repeat around. Join with a sl st to beginning. (55 sts)
R7-10: Ch 2, 1 DC in each st around. Join with a sl st to beginning. (55 sts)
Using color C (shown as blue):
R11: Ch 2, 1 DC in each st around. Join with a sl st to beginning. (55 sts)
R12-14: Ch 2, 1 FPDC in next st, 1 DC in next st. Repeat around. Join with a sl st to beginning. (55 sts)
Do not fasten off, begin on Earflap 1.
Teen / Adult Small
Approx. circumference: 21” / Approx. length: 8”
Hat Base
Beginning with color B (shown as white), and alternating each row with color A (shown as gray):
R1: Using a magic ring, ch 2. 10 DC. Join with a sl st to beginning. (10 sts)
R2: Ch 2, 2 DC in each st around. Join with a sl st to beginning. (20 sts)
R3: Ch 2, 2 DC in next st, 1 DC in next st. Repeat around. Join with a sl st to beginning. (30 sts)
R4: Ch 2, 2 DC in next st, 1 DC in each of the next 2 sts. Repeat around. Join with a sl st to beginning. (40 sts)
R5: Ch 2, 2 DC in next st, 1 DC in each of the next 3 sts. Repeat around. Join with a sl st to beginning. (50 sts)
R6: Ch 2, 2 DC in next st, 1 DC in each of the next 4 sts. Repeat around. Join with a sl st to beginning. (60 sts)
R7-11: Ch 2, 1 DC in each st around. Join with a sl st to beginning. (60 sts)
Using color C (shown as blue):
R12: Ch 2, 1 DC in each st around. Join with a sl st to beginning. (60 sts)
R13-15: Ch 2, 1 FPDC in next st, 1 DC in next st. Repeat around. Join with a sl st to beginning. (60 sts)
Do not fasten off, begin on Earflap 1.
Adult
Approx. circumference: 23” / Approx. length: 9”
Hat Base
Beginning with color A (shown as gray), and alternating each row with color B (shown as white):
R1: Using a magic ring, ch 2. 10 DC. Join with a sl st to beginning. (10 sts)
R2: Ch 2, 2 DC in each st around. Join with a sl st to beginning. (20 sts)
R3: Ch 2, 2 DC in next st, 1 DC in next st. Repeat around. Join with a sl st to beginning. (30 sts)
R4: Ch 2, 2 DC in next st, 1 DC in each of the next 2 sts. Repeat around. Join with a sl st to beginning. (40 sts)
R5: Ch 2, 2 DC in next st, 1 DC in each of the next 3 sts. Repeat around. Join with a sl st to beginning. (50 sts)
R6: Ch 2, 2 DC in next st, 1 DC in each of the next 4 sts. Repeat around. Join with a sl st to beginning. (60 sts)
R7: Ch 2, 2 DC in next st, 1 DC in each of the next 11 sts. Repeat around. Join with a sl st to beginning. (65 sts)
R8-12: Ch 2, 1 DC in each st around. Join with a sl st to beginning. (65 sts)
Using color C (shown as blue):
R13: Ch 2, 1 DC in each st around. Join with a sl st to beginning. (65 sts)
R14-16: Ch 2, 1 FPDC in next st, 1 DC in next st. Repeat around. Join with a sl st to beginning. (65 sts)
Do not fasten off, begin on Earflap 1.
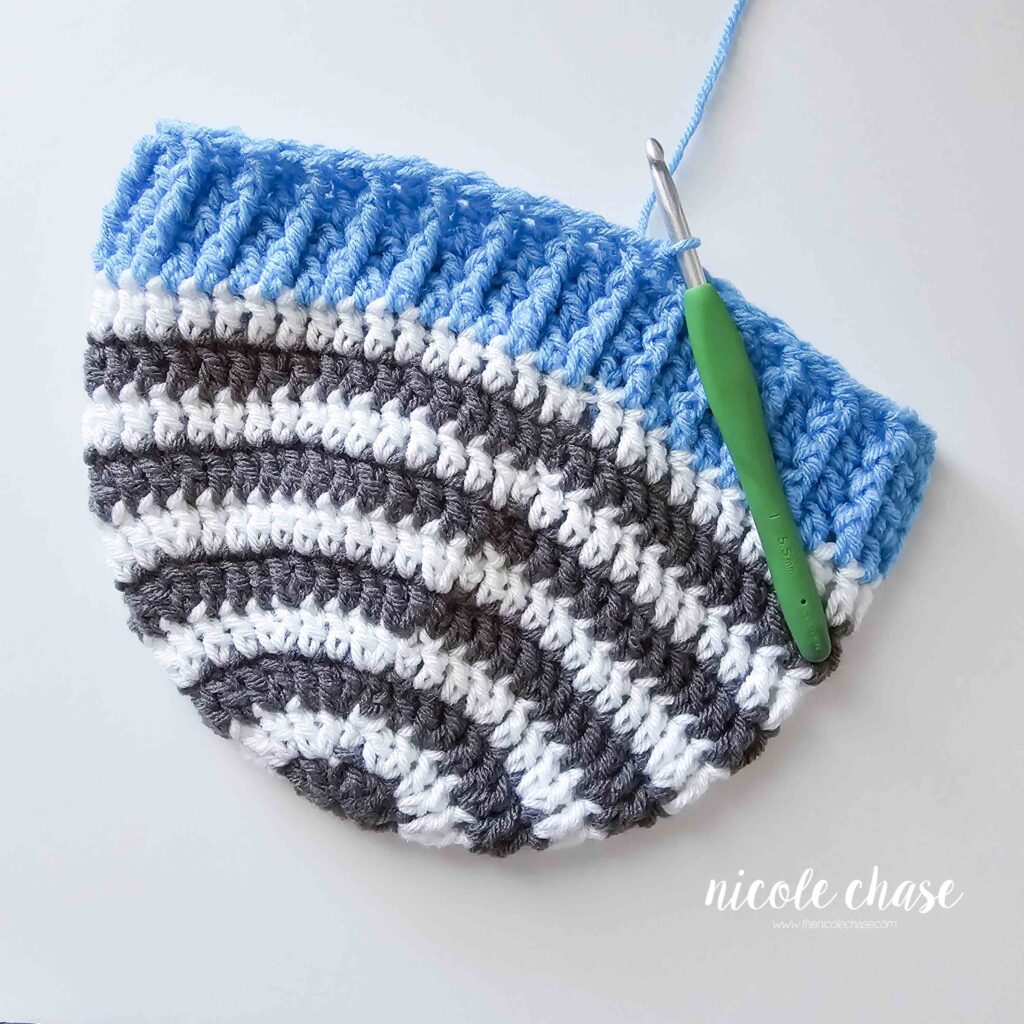
0-3 Months, 3-6 Months, 6-12 Months, and Toddler
Earflap 1
R1: Ch 1, 1 SC in each of the next 10 sts. Place a stitch marker in the next stitch, which remains unworked. (10 sts)
R2: Ch 1, turn, SC2tog. 1 SC in each of the next 6 sts. SC2tog. (8 sts)
R3: Ch 1, turn, 1 SC in each st across. (8 sts)
R4: Ch 1, turn, SC2tog. 1 SC in each of the next 4 sts. SC2tog. (6 sts)
R5: Ch 1, turn, 1 SC in each st across. (6 sts)
R6: Ch 1, turn, SC2tog. 1 SC in each of the next 2 sts. SC2tog. (4 sts)
R7: Ch 1, turn, 1 SC in each st across. (4 sts)
R8: Ch 1, turn, SC2tog, twice. (2 sts)
R9: Ch 1, turn, SC2tog. (1 sts)
Fasten off.
From the stitch marker placed at the beginning of Earflap 1, R1, leave the specified number of stitches (see below) unworked, and begin Earflap 2 in the next st. The stitch marked with your stitch marker will be your first unworked stitch.
- 0-3 Months: 10 unworked sts
- 3-6 Months: 12 unworked sts
- 6-12 Months: 15 unworked sts
- Toddler: 17 unworked sts
Earflap 2
R1: Ch 1, 1 SC in each of the next 10 sts. (10 sts)
R2: Ch 1, turn, SC2tog. 1 SC in each of the next 6 sts. SC2tog. (8 sts)
R3: Ch 1, turn, 1 SC in each st across. (8 sts)
R4: Ch 1, turn, SC2tog. 1 SC in each of the next 4 sts. SC2tog. (6 sts)
R5: Ch 1, turn, 1 SC in each st across. (6 sts)
R6: Ch 1, turn, SC2tog. 1 SC in each of the next 2 sts. SC2tog. (4 sts)
R7: Ch 1, turn, 1 SC in each st across. (4 sts)
R8: Ch 1, turn, SC2tog, twice. (2 sts)
R9: Ch 1, turn, SC2tog. (1 sts)
Do not fasten off. Begin finishing.

Child, Teen, and Adult
Earflap 1
R1: Ch 1, 1 SC in each of the next 12 sts. Place a stitch marker in the next stitch, which remains unworked. (12 sts)
R2: Ch 1, turn, SC2tog. 1 SC in each of the next 8 sts. SC2tog. (10 sts)
R3: Ch 1, turn, 1 SC in each st across. (10 sts)
R4: Ch 1, turn, SC2tog. 1 SC in each of the next 6 sts. SC2tog. (8 sts)
R5: Ch 1, turn, 1 SC in each st across. (8 sts)
R6: Ch 1, turn, SC2tog. 1 SC in each of the next 4 sts. SC2tog. (6 sts)
R7: Ch 1, turn, 1 SC in each st across. (6 sts)
R8: Ch 1, turn, SC2tog. 1 SC in each of the next 2 sts. SC2tog. (4 sts)
R9: Ch 1, turn, 1 SC in each st across. (4 sts)
R10: Ch 1, turn, SC2tog, twice. (2 sts)
R11: Ch 1, turn, SC2tog. (1 sts)
Fasten off.
From the stitch marker placed at the beginning of Earflap 1, R1, leave the specified number of stitches (see below) unworked, and begin Earflap 2 in the next st. The stitch marked with your stitch marker will be your first unworked stitch.
- Child: 20 unworked sts
- Teen: 22 unworked sts
- Adult: 25 unworked sts
Earflap 2
R1: Ch 1, 1 SC in each of the next 12 sts. (12 sts)
R2: Ch 1, turn, SC2tog. 1 SC in each of the next 8 sts. SC2tog. (10 sts)
R3: Ch 1, turn, 1 SC in each st across. (10 sts)
R4: Ch 1, turn, SC2tog. 1 SC in each of the next 6 sts. SC2tog. (8 sts)
R5: Ch 1, turn, 1 SC in each st across. (8 sts)
R6: Ch 1, turn, SC2tog. 1 SC in each of the next 4 sts. SC2tog. (6 sts)
R7: Ch 1, turn, 1 SC in each st across. (6 sts)
R8: Ch 1, turn, SC2tog. 1 SC in each of the next 2 sts. SC2tog. (4 sts)
R9: Ch 1, turn, 1 SC in each st across. (4 sts)
R10: Ch 1, turn, SC2tog, twice. (2 sts)
R11: Ch 1, turn, SC2tog. (1 sts)
Do not fasten off. Begin finishing.
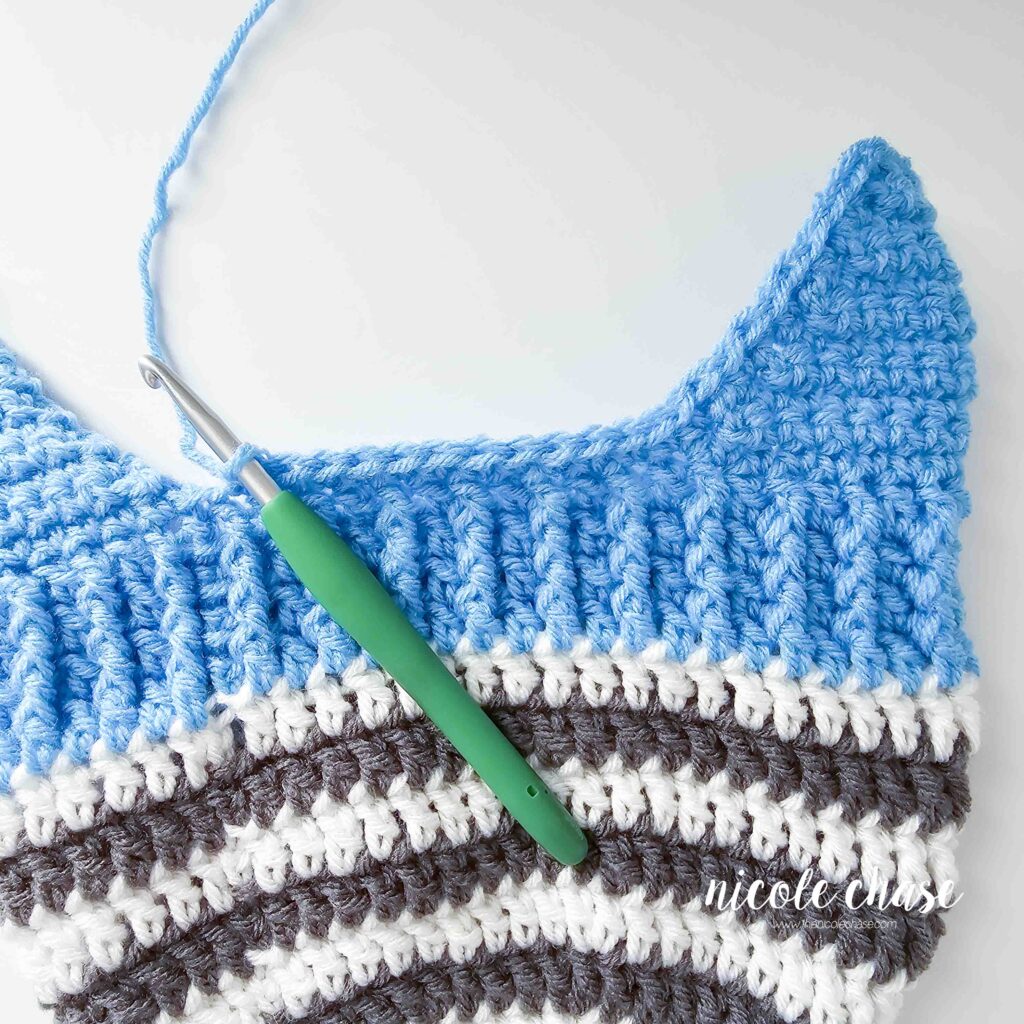
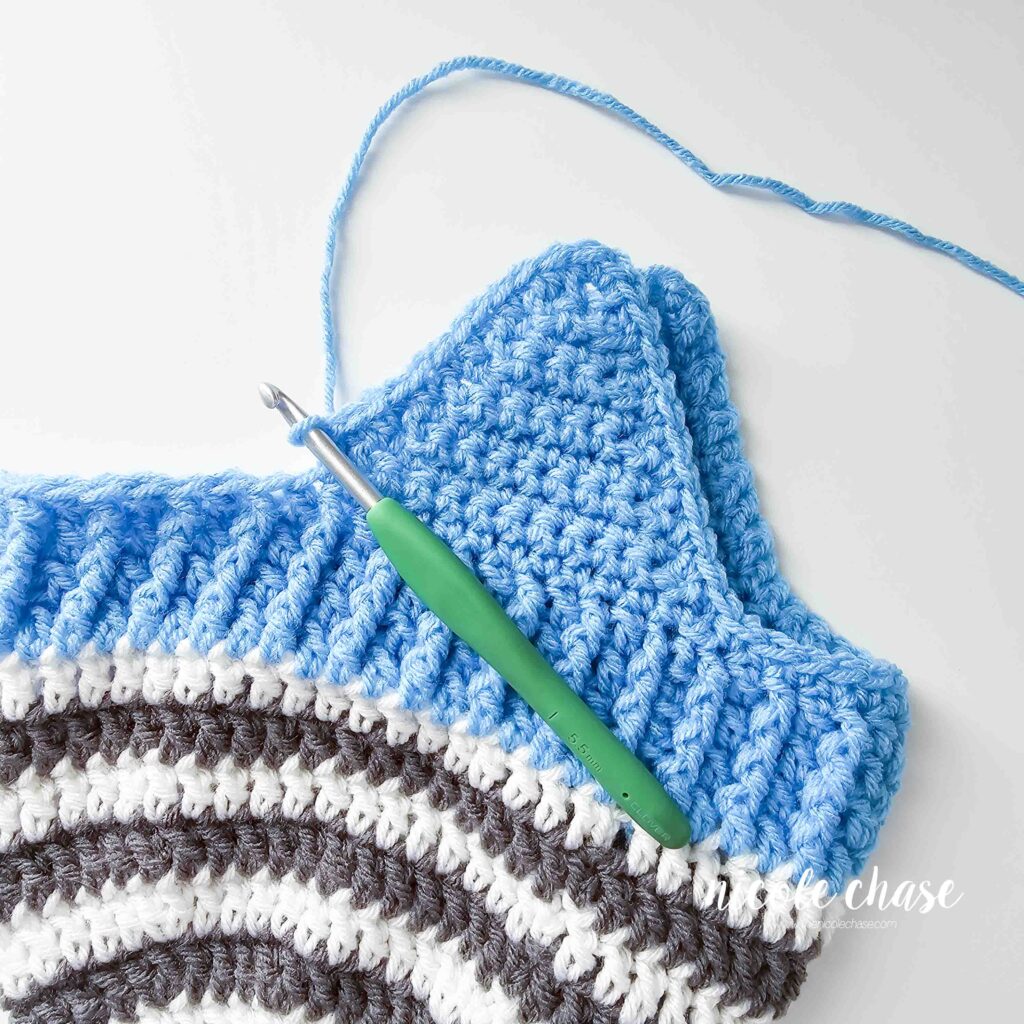
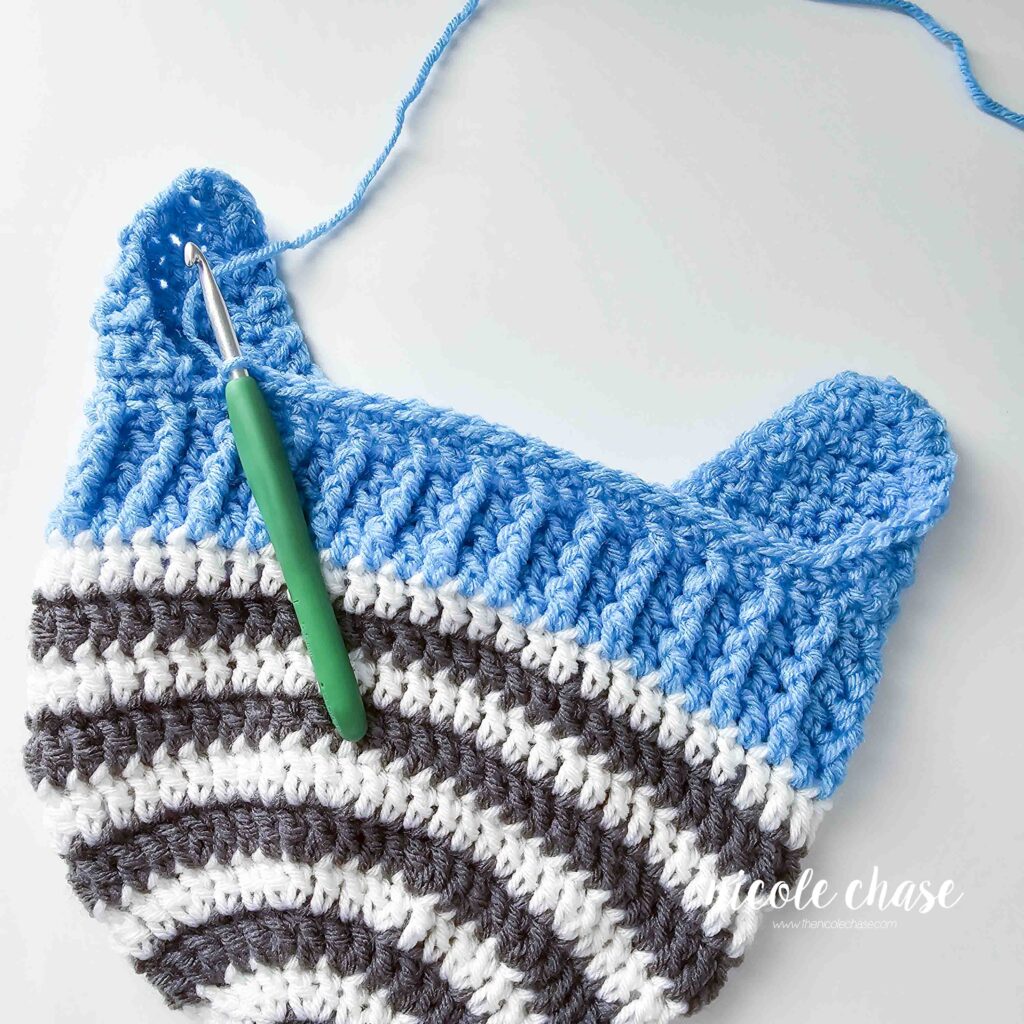
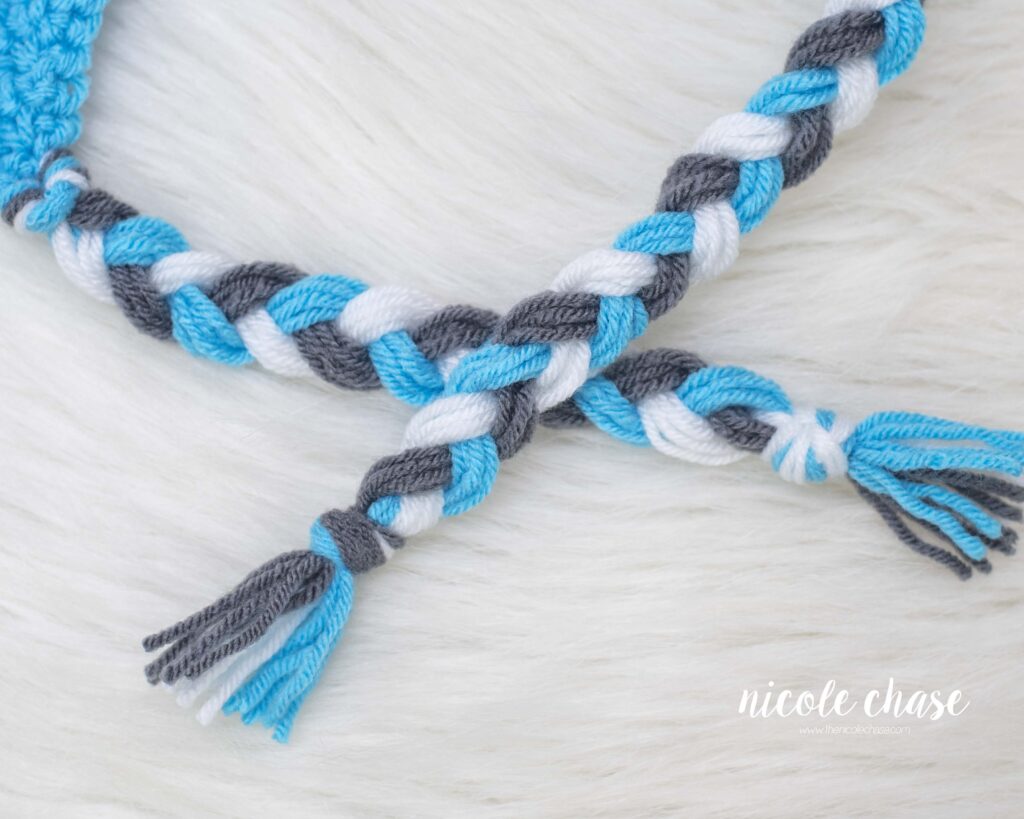
Assembly & Finishing (All Sizes)
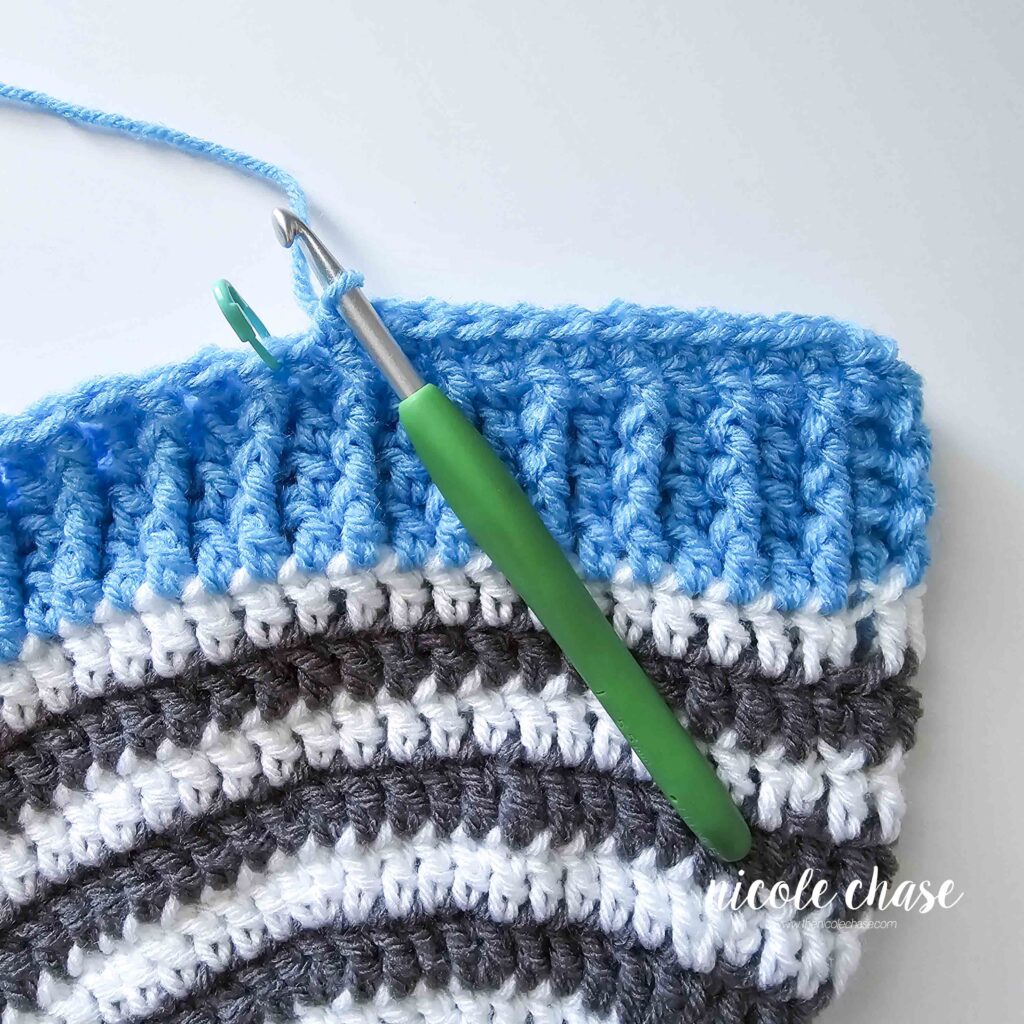
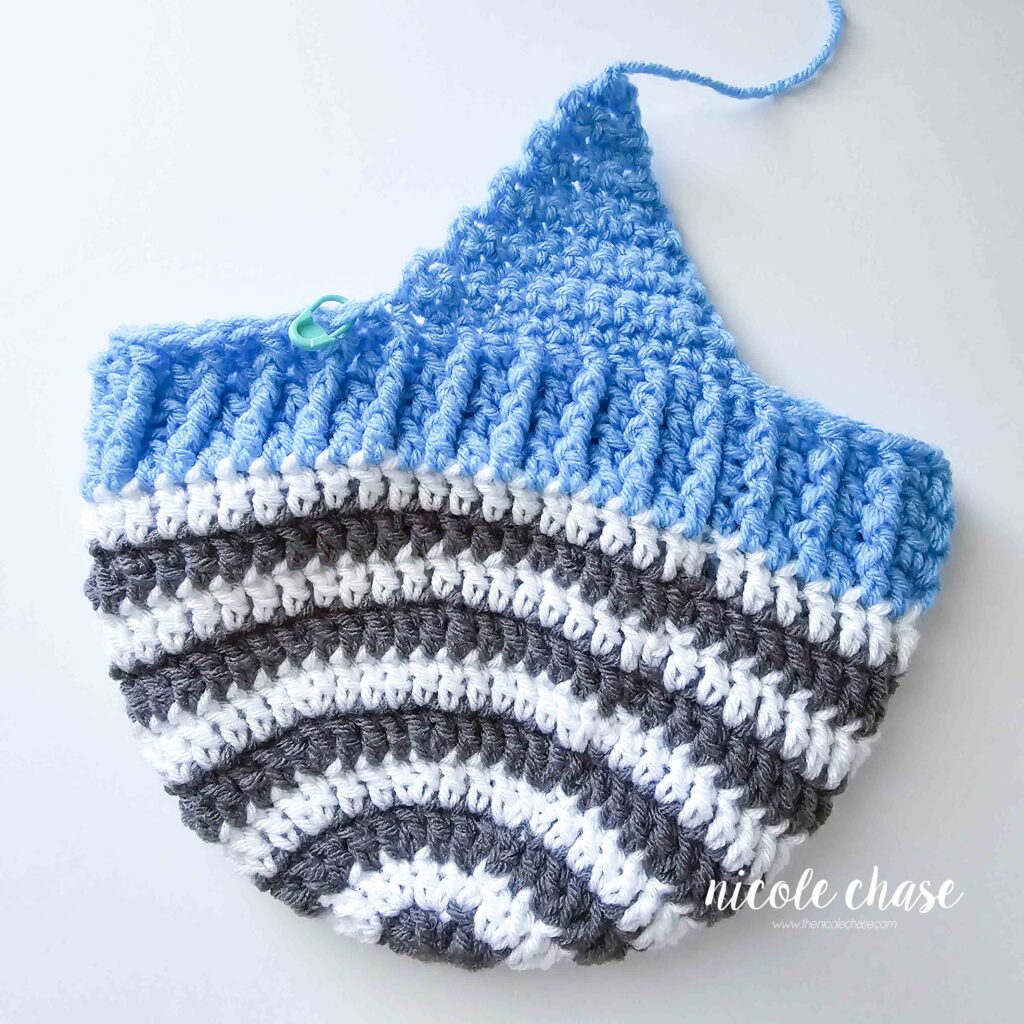
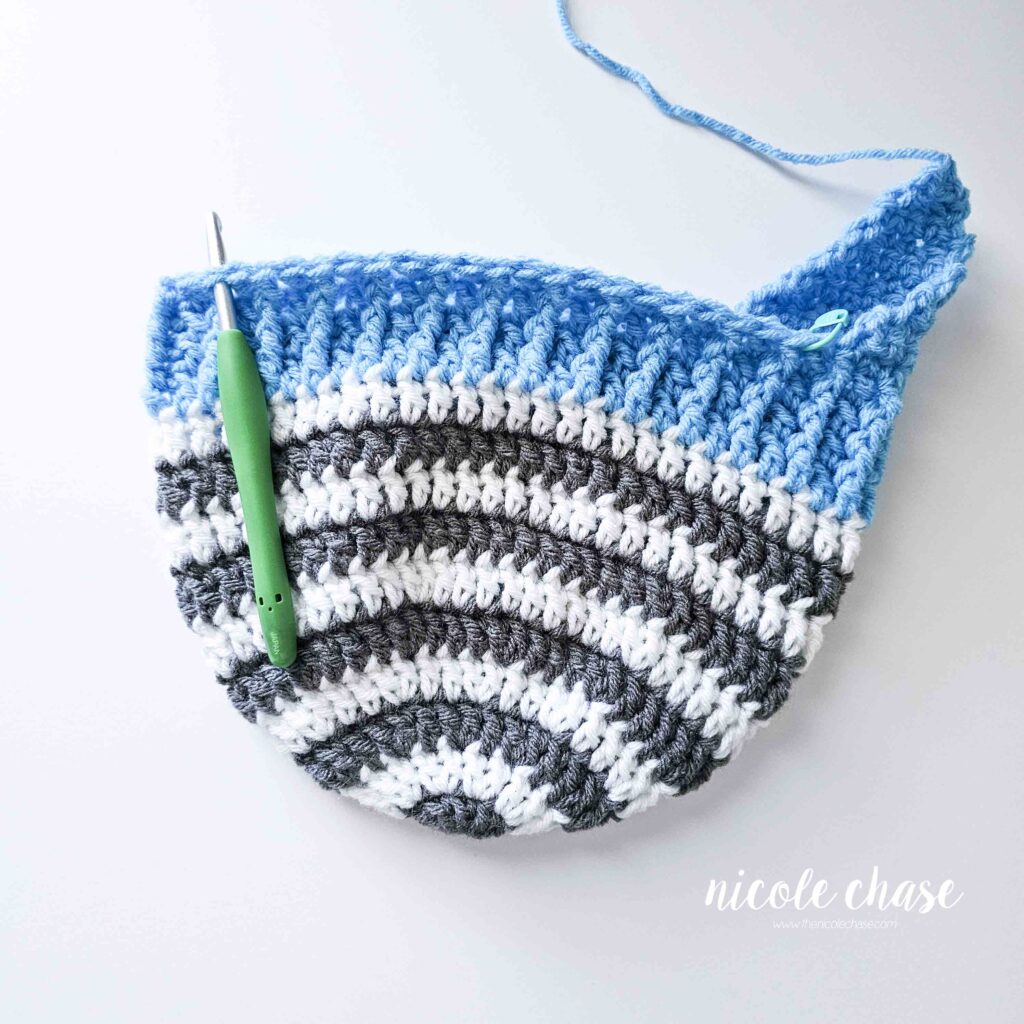
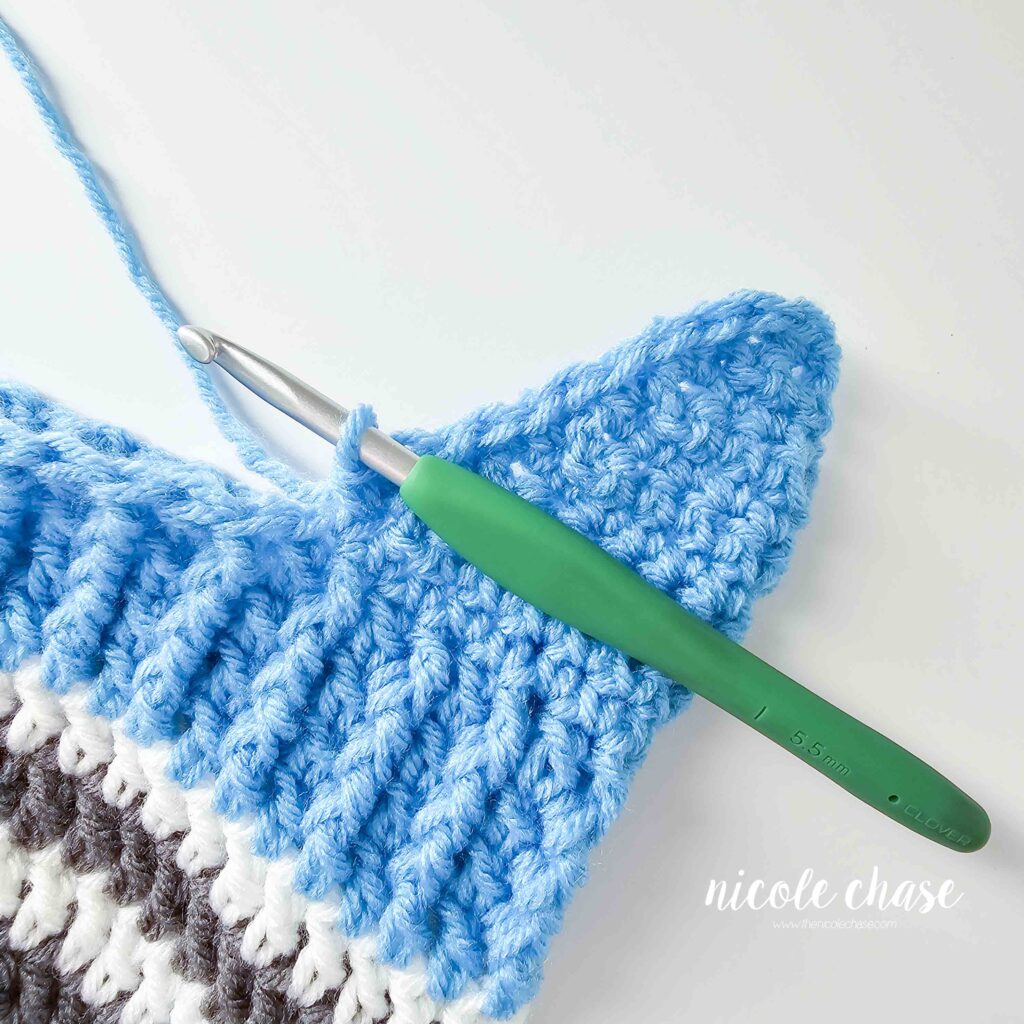
See tutorial photos.
Trimming
Ch 1, work 1 SC down Earflap 2, around the back edge of your hat, up and over Earflap 1, around the front edge of your hat, and back up Earflap 2 to your beginning st. Join with a sl st to your first SC.
Fasten off and weave in ends.
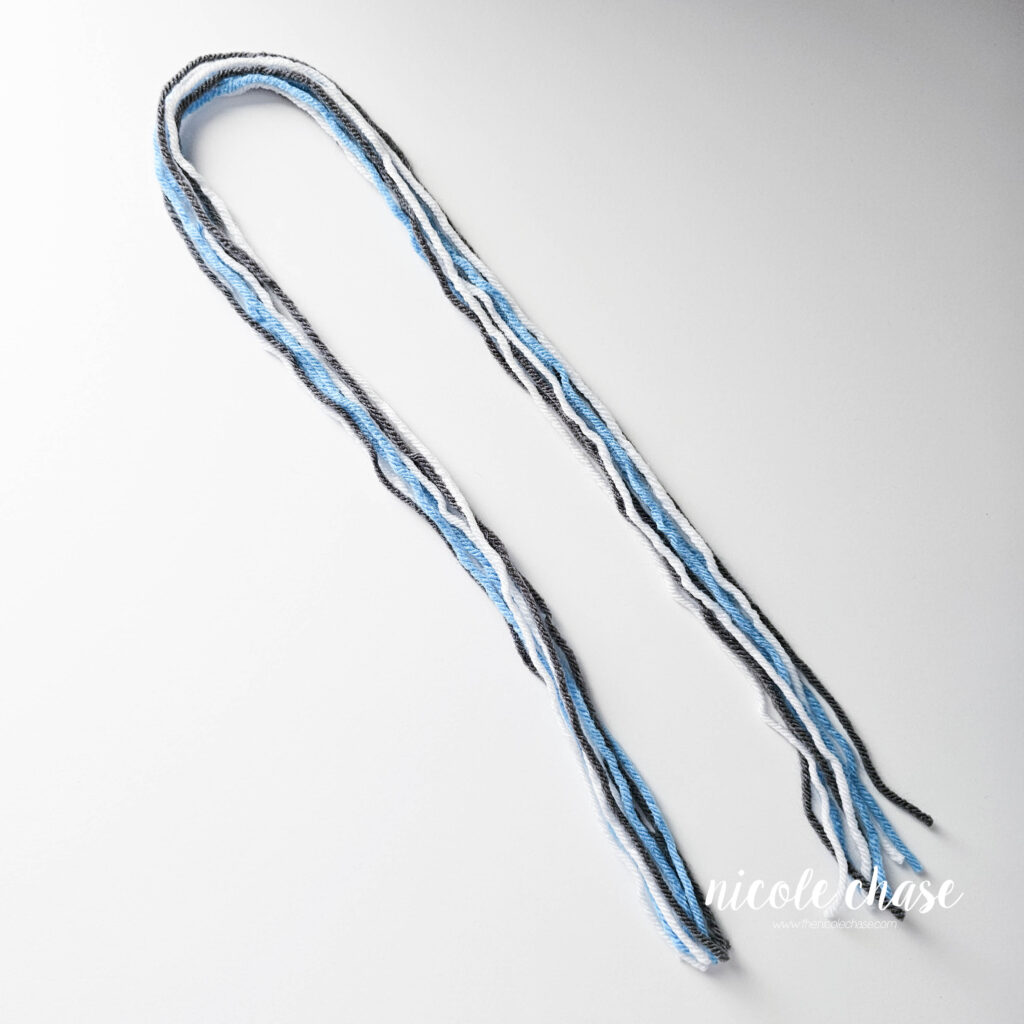
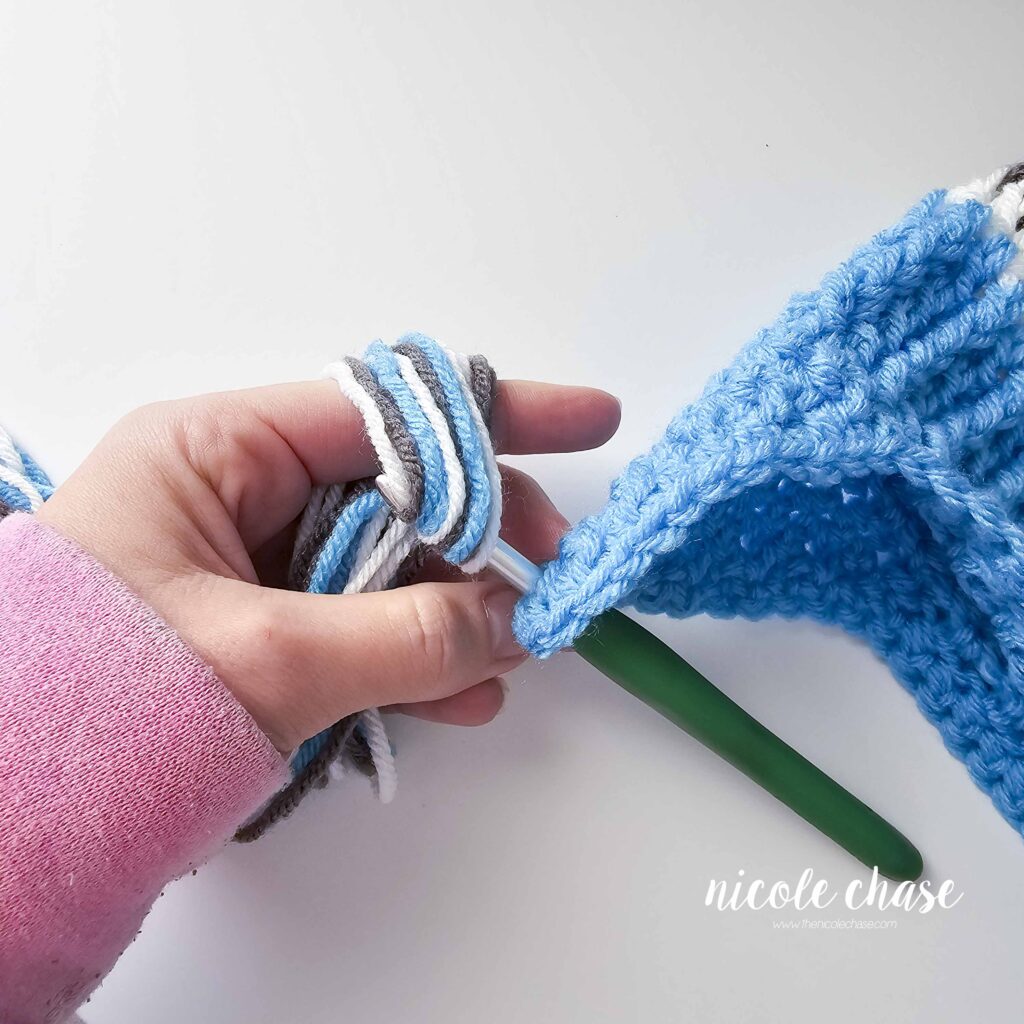
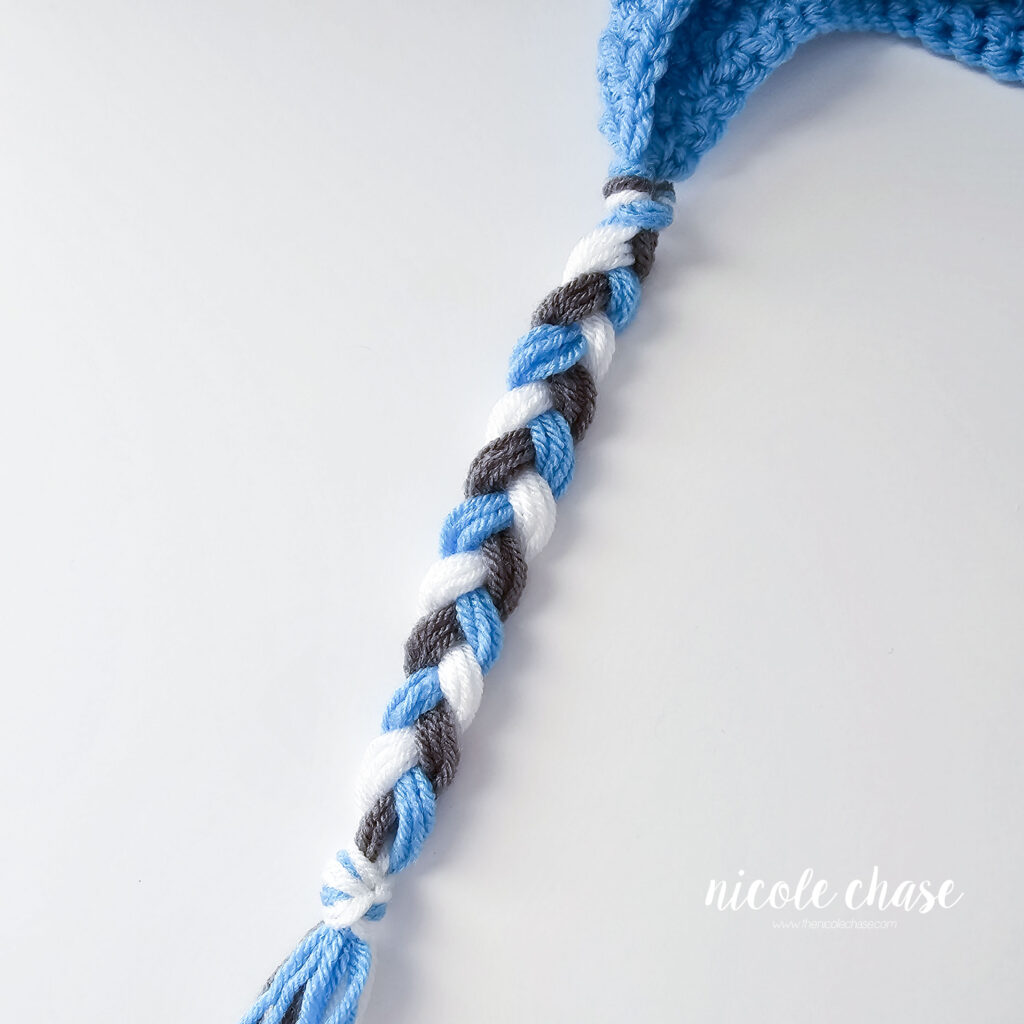
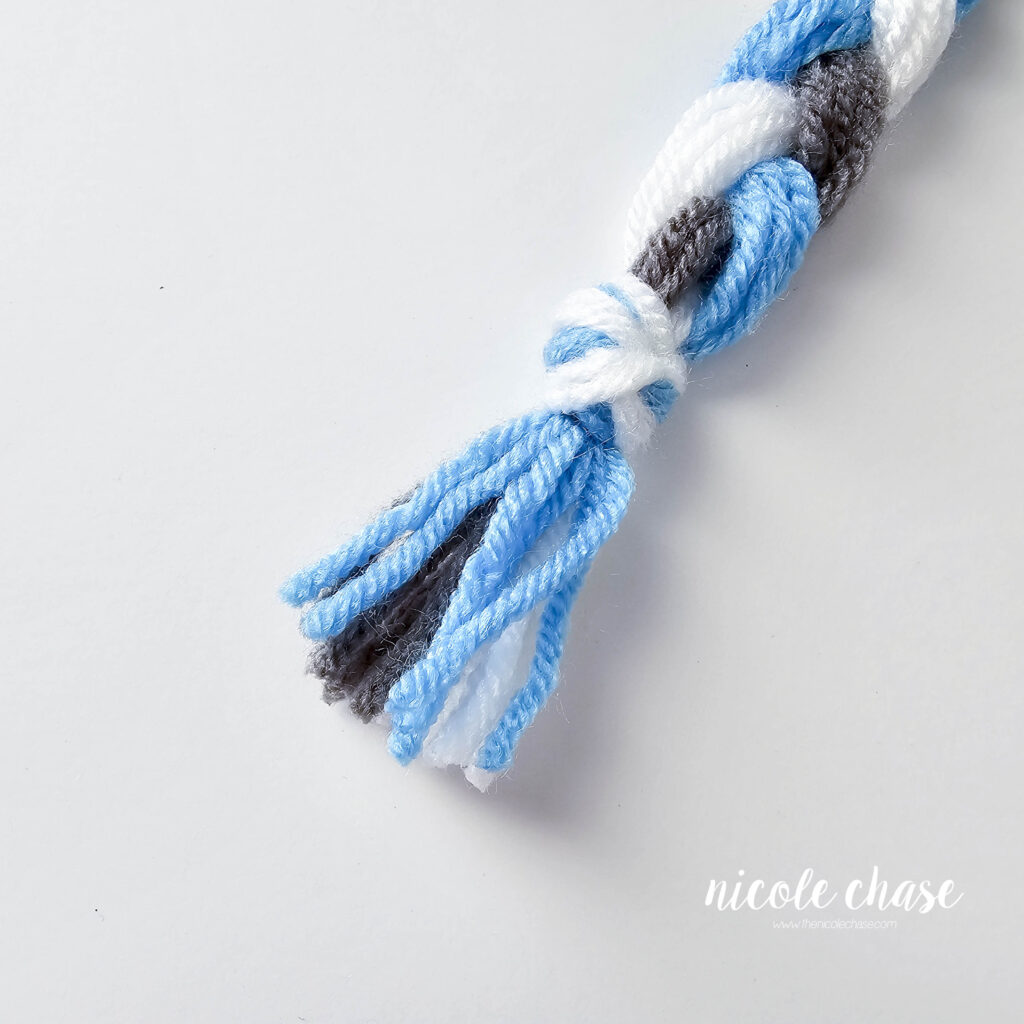
Tassels (one for each earflap)
Cut 3 long equal strands of colors A, B, and C, for a total of 9 strands for each tassel. The strands should be long enough that when folded in half, the length is slightly longer than your desired finished tassel length.
Insert your hook at the bottom of the Earflap. Pull the strands of yarn through with your hook and tie a knot with all strands held together to secure.
Separate the strands by color and braid them together. Tie a knot at the end of the braid to secure. Cut yarn ends to be even.


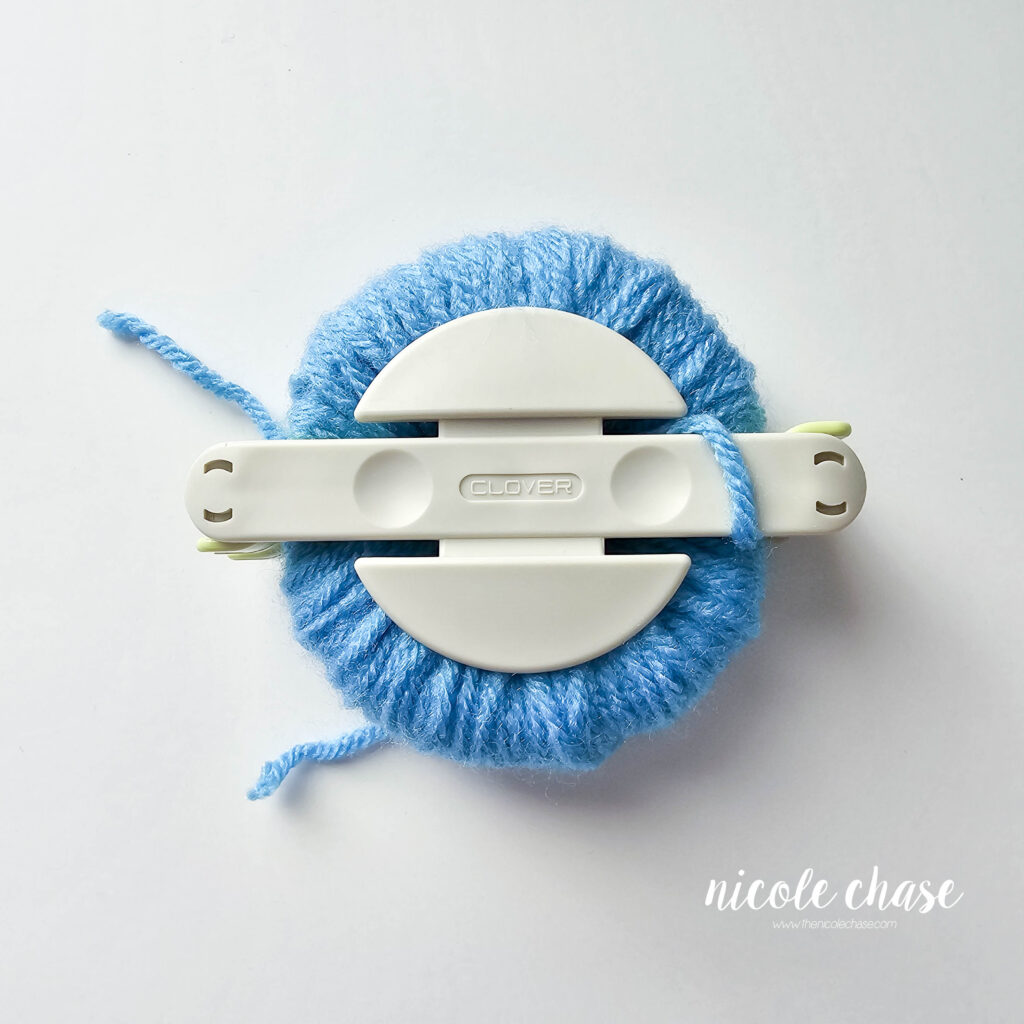
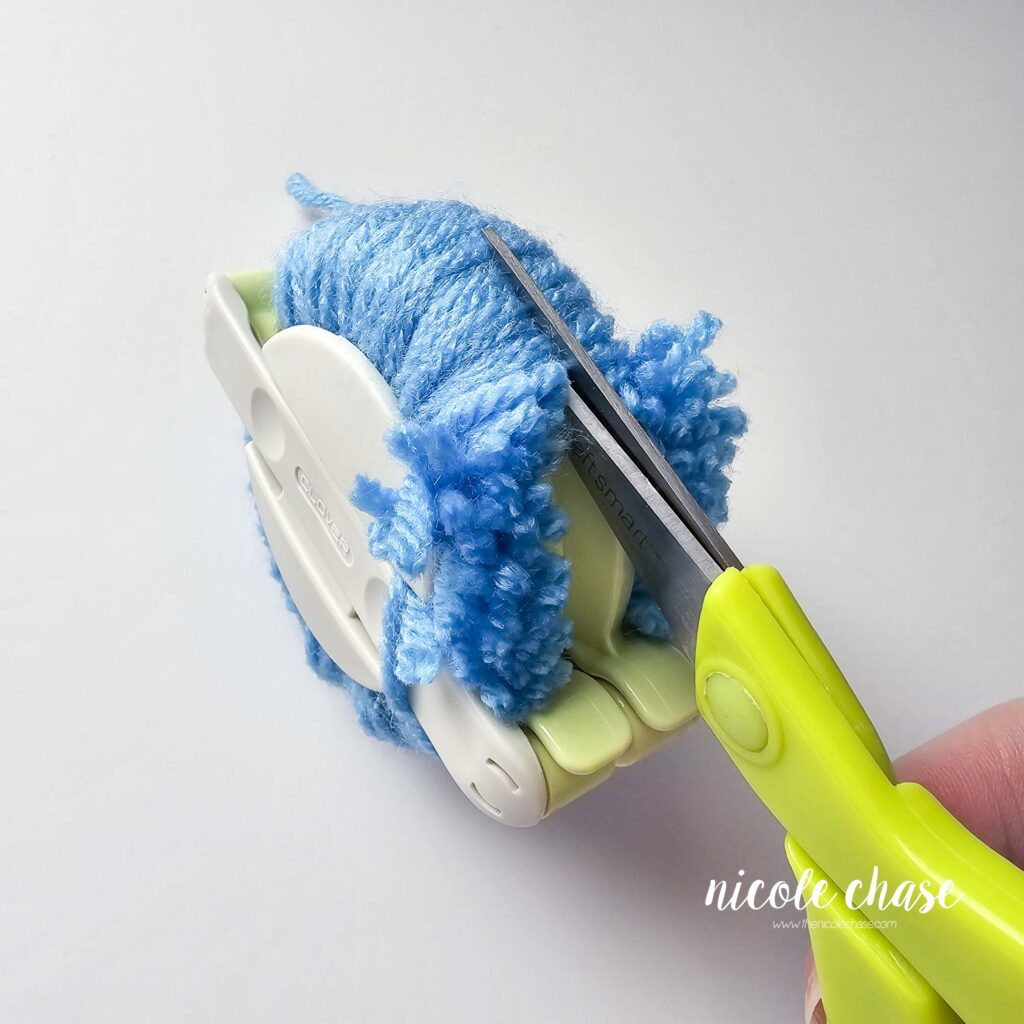
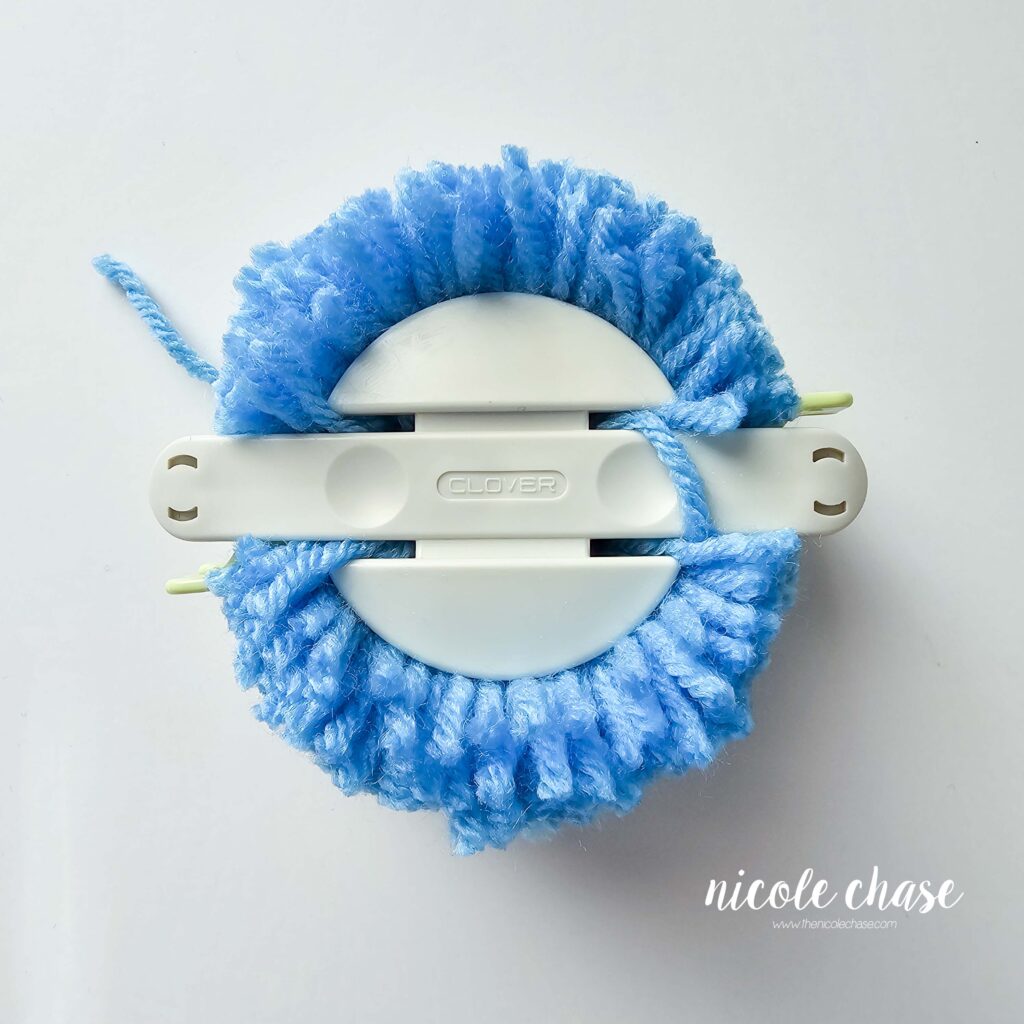
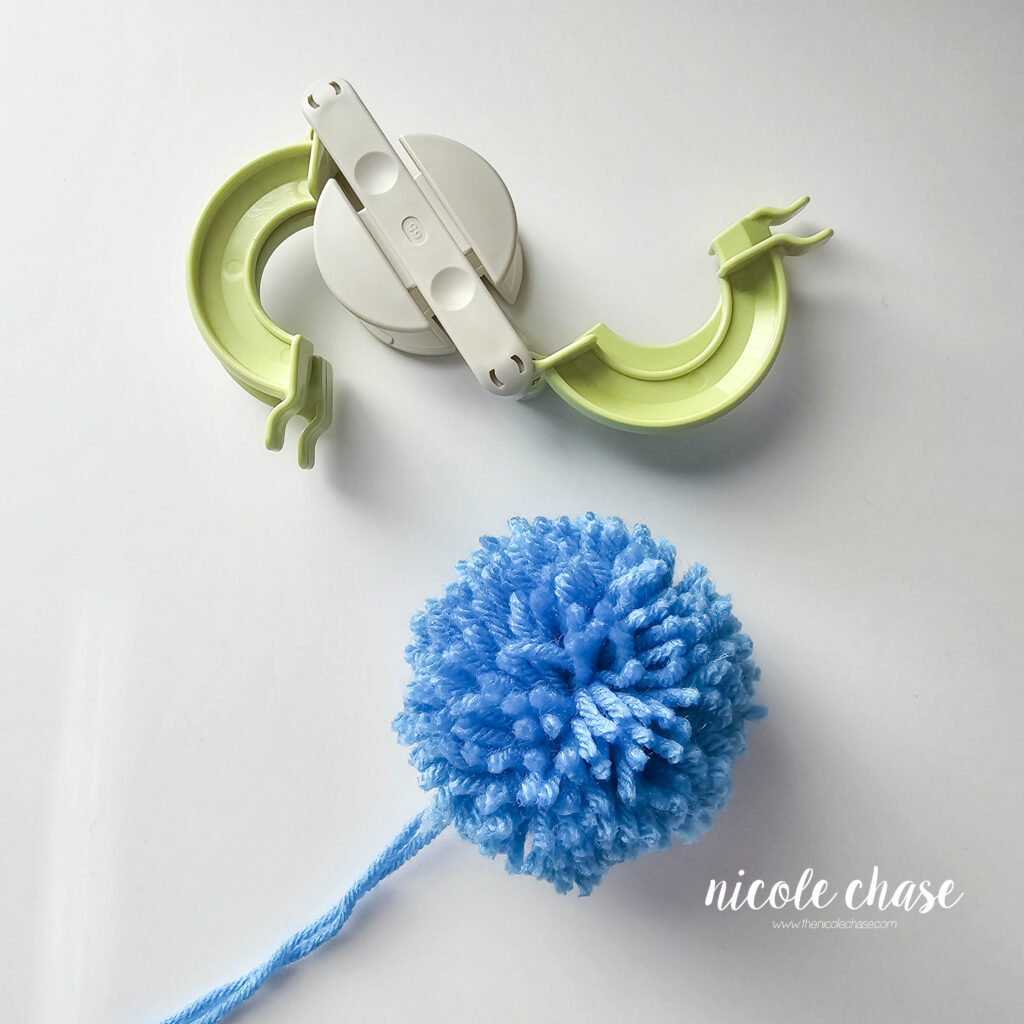
Pom Pom
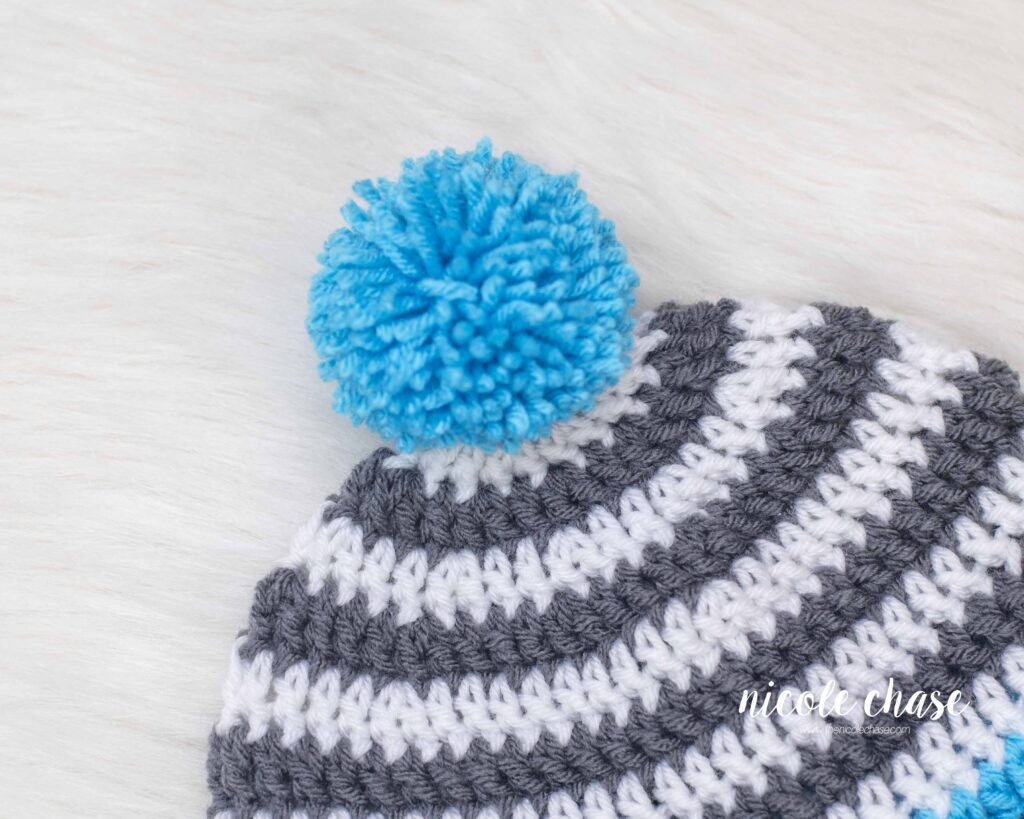
Using color C (shown as blue), create a pom pom with a pom maker.
Attach the pom pom to the top of the hat.
I hope you enjoyed this free pattern for a crochet earflap hat!


Ad-Free PDF Pattern for Spirit Earflap Hat
Tips & Tricks
- Check your gauge before making any item that requires a certain fit.
- It’s best to select sizing based on head circumference, rather than age sizing alone.
Alterations
- Customize this hat to support your favorites by making this crochet earflap hat in your school or team colors!
- Instead of stripes, skip the color changes and make a basic trapper hat in any solid color.
- Add appliques to the finished hat to create a variety of designs.
More Free Hat Crochet Patterns
If you enjoyed this free crochet earflap hat pattern, you may also enjoy my other free hat patterns, such as the Simply Slouchy Beanie or the Kady Beanie.
I hope you enjoyed this pattern! If you make it, leave me a comment below.
Want to see more from me? Be sure to subscribe to my email newsletter so that you never miss a pattern!
Follow along with me on Instagram for daily updates and a behind the scenes look at my designs.
I’d love to see what you make with this tutorial! Don’t forget to share your finished work with me: on social media by tagging me @thenicolechase, in your Ravelry projects, or post over in my Facebook group!
Thanks for stopping by! Happy crafting!
Nicole
PATTERN COPYRIGHT © 2024 NICOLE CHASE. ALL RIGHTS RESERVED.
PATTERN MAY NOT BE ALTERED, COPIED, REDISTRIBUTED OR SOLD AS YOUR OWN PATTERN.
YOU MAY SELL THE FINISHED PRODUCT ON A SMALL SCALE. PATTERN/DESIGN CREDIT GIVEN TO WWW.THENICOLECHASE.COM IS APPRECIATED. PERMISSION TO SELL DOES NOT INCLUDE MASS PRODUCTION. LARGE SCALE PRODUCTION IS PROHIBITED.
PHOTOGRAPHY COPYRIGHT © 2024 NICOLE CHASE. ALL RIGHTS RESERVED.
PHOTOS MAY NOT BE ALTERED, COPIED, REDISTRIBUTED OR SOLD AS YOUR OWN.
I’m confused by the instruction Magic ring, chain 2. I’ve made many magic rings but the pattern usually indicates how many sc to put into the magic ring. Sorry if this is obvious. I’m a beginner when it comes to wearables.
Hello! Just instead of starting your single crocheting into the ring, you’ll ch 2, and then work your DC into the ring. 🙂 Alternatively, you could ch 3 and work your DC sts into the first ch. Hope that helps!
I’m making a child size hat and I’m stuck on row 13 in regards of alternating FPDC in one stitch and DC in the next. Do you have a how to video to show where to place your hook?
Hello,
Sorry, I don’t have a specific tutorial video, but I do have a quick Reel on Instagram that might help give you a visual. It is at a faster speed though. I’ll link it below. It might help you to keep in mind that the 2 lines that you would normally insert your hook into are directly above the post of the stitch, so if you are working the DC, you’ll then find the next 2 lines where you’d put a DC, and follow it down to identify what is the post of that stitch. Hope that helps!
https://www.instagram.com/reel/Cz38fIwu4LZ/?igsh=MTc3NnhldmZxaXlsMw==
This turned out so cute! Worked up in a few hours start to finish! I love this pattern! Thank you so much! I have a picture of my finished product I’d love to share with you if interested!
I’m so glad you enjoyed it! I got your email; thank you so much for sharing! 🙂
I’m struggling with the blue brim. My brim is rolling up. What am I doing wrong?
Perhaps your tension is too tight? You can try using a larger hook size. Hope that helps!
Just made a child size hat … this is one of the easiest patterns & hats I’ve ever made !!! So full of texture & color possibilities are so fun ! I’m going to make some more … working on hats & scarves for a friend who works with a mission group that takes a yearly trip to the Dakota’s … kids are the most requested and I can get one of these a day done !!! THANK YOU !!
Thank you so much! I’m so glad to hear that!
Not sure if you’re doing something i’m not, but the toddler size ended up at 14.5" instead of the 18" it was supposed to be, and I used the hook and yarn sizes you suggested. Any ideas?
Hi Lauren! It sounds like your gauge is tighter than mine. Checking your gauge before starting a pattern will help you decide if you need to go up or down on your hook size. 🙂
You could either go up in hook size, or make the next size up.
Let me know if you have any other questions. Thanks!